How to Prepare a CD master for CD Duplication and Autorun?
1.0 Introduction
This article will guide you through the process of preparing a CD master (so called gold master) for duplication or replication. We will discuss how to prepare your CD based on the nature of the content. We will also talk about preparing the artwork to be printed onto the CD.
The content of this article is not meant for novice. If you are going to spend at least few hundreds to thousands of dollars on a CD project, make sure you know what you are doing. In case you just want to get the job done and are willing to spend some money, we recommend you turn to professionals. There are many CD mastering companies out there that can help with very reasonable cost to create a gold master for you.
2.0 Terminologies
Let's begin our discussion with the correct terminologies.
Duplication refers to copying CDs to recordable media such as CD-R or CD-RW. This is normally used for short-run orders when you require to have the order completed in couple of days, or when your ordered quantity is less than 500. Once a CD is duplicated, we will print your artwork onto a glossy paper label with inkjet printer and the label will be applied to the non-data side of the CDs.
Replication, on the other hand, refers to making CDs from a glass stamper. Polycarbonate beads are heated to 350 degrees centigrade and the molten plastics is injected into the mold cavities of the glass stamper. The substrate disc is then galvanized with an aluminum reflective layer and a final laquer coating is applied to protect the aluminum layer from damage and oxidation. The laquer is then harden by UV light and the disc is now ready for silkscreen or offset printing. You should use the replication service if you can afford about 10 day lead-time and your ordered quantity is 500 or more. Replicated CDs look much more professional and are the disc you normally find in retail packages such as the CD of Madonna or Britney Spears.
Volume Label: Every CD except audio CD should have a volume label. When you put a CD into the CD-ROM drive of your computer, whether this is on Windows or Mac, a label is attached to the CD for identification. On Windows you will see this label when you click on [My Computer]. On Mac, the label will be shown below the CD-ROM icon on the desktop. If unset, you are at the discretion of the CD burning software. For example NERO will put the word [New] as the volume label for you. Other CD burning software may just put a random number as the volume label. You should always change the default text to something meaningful
Autorun: Autorun is a feature on Windows such that an application is chosen to be run automatically when a CD is put into the CD-ROM drive. You should always try to make your CD autorun so users with limited computer skill and make use of your CD. The way to autorun will be slightly different depending upon the file that needs to be autorun. We will describe them in the following discussion.
3.0 Preparing the content of the CD
Whether you are going to do duplication or replication there is always content to be put onto the CDs. The content can be music, software, PowerPoint /Flash presentation, or any digital information you can think of. Unless we are hired to create the content for you, you should be responsible for the content. Garbage in garbage out is always true. If you send us a master disc that already has content defects (not necessary physical defects), then there is no such thing as garbage in gospel out. That said, we will try to do some preliminary test when we receive your master so obvious error can be detected. In the following discussion we will talk about few commonly used contents and how to prepare them.
3.1 Audio, Music
If your content is music then you will need to make a completely authored CD to us for replication or duplication. An already authored audio CD is a CD that will play normally in a standard CD players. Don't just send us the wav files or the MP3 files. Although it's very simple for us to create an audio CD from wav files, we prefer not to get involved in rendering the content. An obvious mistake is that, without knowing the inherent content, we might mix up the track order of your CD. As the owner of your own content this mistake will be less likely to be committed.
If you use NERO, creating an audio CD is pretty straightforward. Just get your audio files ready, be them wav, wma, or mp3 files.
Once invoked, mouse over the [Audio] icon and then choose the [Make Audio CD] option.
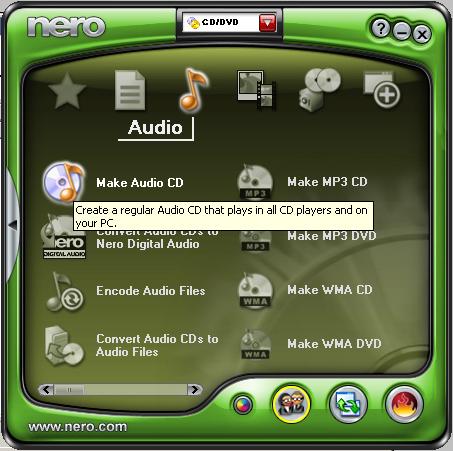
Drag and drop your audio files to the window or press the [Add] button to find the files.
You can then rearrange the track order by highlighting a track and then drag it to the new position.
You can now enter the [Title (CD TEXT)] and [Artist(CD TEXT)] fields which will be shown on CD players that have an LCD display
Remember to check the [Verify data on disc after burning] checkbox before pressing the [Burn] button.
3.2 PDF Files
CD has been found a wonderful alternative to printed matter for sending product literature to potential customers. Marketers have found using CD will cut down the cost substantially. To print a 20-page catalog on paper will most likely cost over $2.00 per copy but the cost of a CD is much lower with much bigger capacity. There is no comparison in terms of order of magnitude. A CD can probably store a 2000-page catalog in PDF file without any problem. Not to mention other features such as audio, video, and web-links can be added to a PDF file.
If you don' t need to autorun your CD with PDF file then burning a master is straightforward and simple. Just create a data CD by treating all PDF files as regular computer file, set the volume label, and voila.
3.2.1 Autorun PDF file
If you need to autorun a PDF file, meaning an PDF file will be shown automatically to the user when the CD is put into the CD-ROM drive, then follow the procedures outlined below.
Step 1
Download the autorunpdf.zip file from our download area.
Step 2
unzip autorunpdf.zip to a temporary directory on your computer.
Step 3
Edit autorun.inf, one of the four files you have unzipped and replace the filename place holder with the actual PDF file name you need to autorun.
Step 4
Copy autorunpdf.exe, autorun.inf, and readme.htm to the root directory of your CD together with other files you need to put on the CD.
Step 5
Burn the CD as a data CD.
Step 6
Test the autorun feature on a system with Acrobat installed and without. On a system with Acrobat installed, the PDF file will be started automatically. On a system without Acrobat installed, the content of readme.htm will be shown to direct the user to download Adobe Acrobat. You can change the content of readme.htm to suit your needs.
3.3 Video Files
Video has been found to be the most efficient way to deliver a message in the shortest time. Messages in a video are much easier to be absorbed than thousands of words. To prepare a CD with video content you should decide whether the CD will be solely played on a computer or both the computer and DVD player. If you choose to play the CD on computer only, you can convert the video into one of these formats, i.e. wmv, asf, or mpg. If you need the CD to be played on both computers and DVD players, VCD or SVCD should be the format of choice. We will talk about VCD and SVCD in the next section
3.3.1 Autorun wmv, asf, and mpg files
The steps below is designed to autorun a video file using Windows Media Player as the video player.
Step 1
Download the program starter, starter.zip, from our download area and unzip startpgm.exe to a temporary directory on your computer.
Step 2
Create a file called autorun.inf using Notepad or any text editor with the following content
[autorun]
open=startpgm.exe video_file_to_be_autorun.xxx
where video_file_to_be_autorun.xxx should be replaced with the your own file.
Step 3
Copy the video file, autorun.inf, and startpgm.exe to the root directory of your CD.
Step 4
Burn the CD as a data CD.
Step 5
Test the CD on all Windows platforms. Depends on how you encode your video, Windows Media Player might ask you to download the latest codec in order to play. Just follow the on screen instructions if this happens.
3.3.2 Autorun VCD
The simplest way to autorun a VCD is by bring up Windows Media Player to play the video. To do that we will have to create an Active Streaming XML (or ASX) file. The reason behind this is very simple. VCD video file always have the file extension .DAT and .DAT is also the file extension for a Windows system file. If you use a program starter or ShellExcute to start a .DAT file Windows won't know whether your .DAT file is a video file or a system file. To eliminate this ambiguity we will create an .ASX file to encapsulate the video .DAT file so Windows knows it's a video file and will play it with Windows Media Player. Here is the procedure.
Step 1
Create a text file called vcd.asx with the following content
<ASX Version = "3.0">
<Title>Name of my Video CD</Title>
<Entry>
<Title>My Video Clip #1</Title>
<Ref href = "MPEGAV\AVSEQ01.DAT" />
</Entry>
</ASX>
Step 2
Create another text file called autorun.inf with the following content
[autorun]
open=startpgm.exe vcd.asx
Step 3
Download the program starter, starter.zip, from our download area and unzip startpgm.exe to a temporary directory on your computer.
Alternatively you can skip this step by replacing the above open statement as
open=ShellExecute vcd.asx
The advantage of doing so is you will have one less file to be copy. The disadvantage is this won't work on Windows 98 and Windows NT 4.0 as ShellExecute is not available on these versions of Windows. By using startpgm.exe you can assure it will work on all Windows platforms.
Step 4
Copy vcd.asx, autorun.inf, and startpgm.exe to the root directory of your VCD. This is done during the CD burning stage and we are showing you how to do it using NERO.
[Nero Step 1]
Don't use Nero StartSmart. Instead, start Nero Burning ROM by going through [Start] > [Programs] > [Nero] > [Nero 6 Ultra Edition] > [Nero Burning ROM].
[Nero Step 2]
Drag and drop your video file from the file browser on the right to the pane on the left.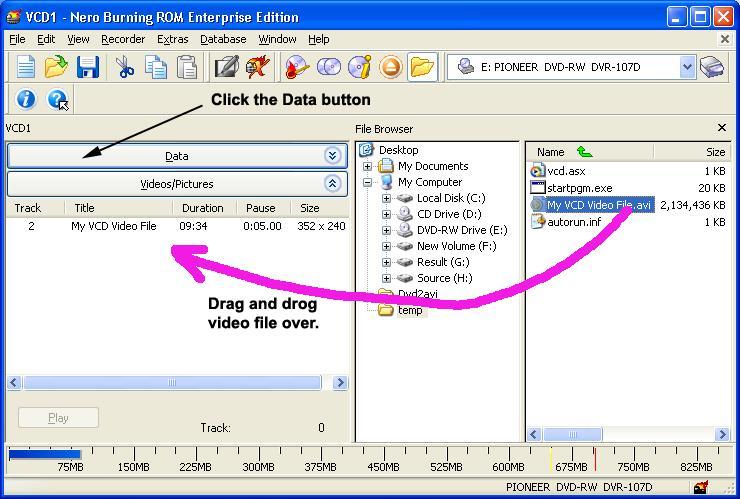
[Nero Step 3]
Press the [Data] button.
[Nero Step 4]
Drag and drop vcd.asx, startpgm.exe, and autorun.inf from the file browser to the root of the VCD directory as shown below
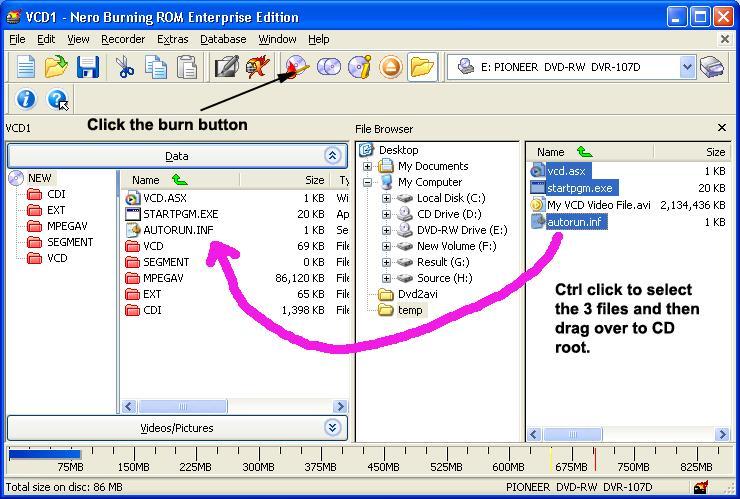
[Nero Step 5]
Press the burn button to burn the VCD.
3.4 Flash Animation
To autorun a Flash animation is pretty simple. Once you are done with your Flash authoring you will need to publish it. Flash publishing allows you to have few options. Press [Ctrl + Shift + F12] to bring up the Publishing Settings dialog. Check the [Windows Projector (.exe)] checkbox. If you also want the presentation to run on Macintosh, check the [Macintosh Projector] checkbox as well.
Once you have the .exe file, just create your autorun.inf file as below.
[autorun]
open=xxx.exe
icon=xxx.exe
Where xxx is the name of the .exe file, Demo in our example here.
Warning:
A word of caution about the .hqx file created by Flash if you intend to use it on a Mac. If you burn this file on a PC without special treatment, the Mac system will treat as regular archive file similar to a zip file and the Mac users will need to unzip that file first before they can run the presentation. The best way is to transfer this .hqx file to a Mac system first, retrieve the projector file from the .hqx file first and then burn the file together with the PC files on a Mac. If you don't have a Mac, you should use special utility such as CDEverywhere to create a hybrid CD. Most PC users, even the gurus, sometimes fail to see this pitfall.
3.5 PowerPoint Presentation
Same as HTML file, a PowerPoint file is not self-executable. You may be tempted to think that the same tactics to handle HTML file should work for PowerPoint. In most cases it will, provides that the users’ systems have PowerPoint installed. In case the viewer’s system does not have PowerPoint, the method will fail badly.
Note: Most PowerPoint versions have the [Package for CD] under [File] > [Export]. But the output also assumes the users have PowerPoint Installed on their computer. Microsoft used to have a free product called PowerPoint viewer but unfortunately this product has been pulled off by Microsoft. You can still download it from non-Microsot sites if you Google the keyword “portable powerpoint viewer.”