Making Professional DVD from Authoring to Replication
Making DVD is both a science and an art. With the ever decreasing prices on powerful PCs and peripherals, you and I can create great DVDs that used to require big investment on hardware and software just few years ago. Now a $400 PC from Dell or other PC manufacturers will be good enough to create somewhat professional DVDs.
In this article I will try to provide you with the basic information to get you started on creating DVDs. All you need is just some basic equipment such as a digital camcorder, an IEEE 1394 controller card or a video capture card. There are lots of other tutorials and HowTos on the web on making DVDs. What distinguishes ours from the others is that we try to cover as much as we can, so novices or pros, prudent or extravagant readers, Windows fans, die-hard Mac users, or Linux supporters can benefit from reading this. In this article we not only tell you how, but in most cases also tell you why.
Table of Contents
1.0 Introduction
As in life there are always trade-offs. If you have tons of money to burn you can get yourself the state-of-the-art system to add great features to your DVDs. But if you like the challenge of experimenting free software, you can be equally satisfied by creating wonderful DVDs without spending a dime on software. But many of you will be in the middle-way category, i.e. spend some but not too much and still get the job done beautifully.
Both the free and advanced approaches require steep learning curves and strong technical background. You will find some "DVD for Dummies" kind of approaches in the middle. I have made no assumption on your technical ability so it's your own decision to choose and read the right sections of this article. The Table of Contents is your best pointer to the appropriate sections. Do study the Workflow, DVD Mastering, and the DVD Replication & Duplication sections though.
1.1 Some Basic DVD Concepts
As you don't need to know combustion engine to drive a car, you don't really need to know how DVD works in order to make great DVDs. Nevertheless, some basic concepts about DVD will help. Let's provide such concepts in form of Q&A.
1.1.1 How many kinds of DVDs are there?
Depends how you see it, there are DVD-Video, DVD-ROM, and DVD-Audio. Each of these DVDs can be in DVD-5, DVD-9, DVD-10, and DVD-18 formats. The first classification is based on functions and the second classification is based on the capacity or playtime. The names of the DVDs are pretty self-explanatory. DVD-Video is for video, DVD-ROM is for pure data, DVD-Audio is for high quality audio, and DVD-R is the recordable version of all these DVDs. There is also DVD+R which is nothing more than a different kind of recordable DVD. The new DVD writers do not care whether the recordable media is in + or - format.
The following table summarizes the different formats of DVDs.
| Format | Capacity | Side / Layer | Video Playtime | Comment |
| DVD-5 | 4.7 GB | Single / Single | 2 hours | The most basic kind of DVD |
| DVD-9 | 8.54 GB | Single / Double | 4 hours | Need to be careful during authoring to choose the correct jumping point from Layer-0 to Layer-1. |
| DVD-10 | 9.4 GB | Double / Single | 4.5 hours | Essentially a DVD-5 on each side. The disc needs to be manually flipped in order to play the other side. No artwork can be printed because both sides contain data. |
| DVD-18 | 17.1 GB | Double / Double | 8 hours | Essentially a DVD-9 on each side. The disc needs to be manually flipped in order to play the other side. No artwork can be printed because both sides contain data. |
Since this article is about authoring video DVD so we will leave the discussion of other functional DVD formats to other people. Jim Taylor's DVD Demystified is like the Bible of DVD and will be a good place to look into.
1.1.2 Are DVDs all the same around the world?
Physically they are. It's the content that makes the difference. This is all because of the different video system used by different regions of the world. In the US the video format is NTSC and in Europe it is PAL or SECAM. NTSC has 30 frames per second and the line density is 720x480 for DVD. PAL has 25 frames per second and the line resolution is 720x576. These resolutions are for normal TV size. For wide screen TV the resolution will be different.
A PAL/SECAM DVD normally won't play on an NTSC regions unless the player has the dual-format feature. Most cheap DVD players do come with this feature. On the other hand, an NTSC DVD will normally play in PAL regions; not because they don't care but the popularity of dual-format players in those regions. To be safe, you should make your DVD in the correct format for the targeted regions to assure 100% viewership.
1.1.3 What do I need to know as the DVD author?
DVD is a feature-rich gadget for the years to come. It has more interactive features than the old VHS tapes. As the author of DVDs you should at least know about the following features unless all you care is just a plain video played from the beginning to the end. Features of DVD include:
- Menu
Menus are like the table of contents for a DVD. On the remote controls of most DVD players there is a Menu button. Pressing the Menu button will bring the screen to a menu on which viewers can choose randomly to jump to specific part of the movie. In it's simplest form a menu can be no more than just few text labels. But it can also get fancy by adding a small movie as the button animation background. When you author your DVD you will need to set break points on the video to mark them for chaptering. - Subtitle
Subtitles are like the Closed Captions (CC) on TV and they can be turn on or off if your DVD player supports this. The most common application of subtitles is to create different language subtitles for foreign viewers. For instance if the main movie is in English and you want French or Spanish viewers to understand the plot, you can add subtitles in French and Spanish. Besides texts, subtitles can be images too and gaming DVDs sometimes do take advantage of this. Creating subtitles can be time consuming task. But with the right tool it will be a pretty straightforward process. We will talk about a free subtitle tool call Subtitle Workshop later. - Audio Tracks
Just like the subtitles audio tracks can be turned on or off if a DVD player supports this feature. With the remote control, you can imagine yourself going to a concert where you can be the conductor to turn the violin on and make the cello silent. Audio tracks can accomplish this effect so individual track can be turned on or off and the overall sound is the resultant of all tracks that are turned on superimposed together. The obvious application of audio track is again for foreign viewer to watch the movie with foreign language voiced over. Combined with subtitles, you can have many language combinations, say, French subtitle with Chinese voice over. - Camera Angles
Camera Angles can be considered as having few movies played simultaneously and the viewers can only pick one movie at a time. With this in mind, you can actually design a DVD to play two totally different scenes and has nothing to do with the camera angles. The original concept of camera angles is to look at a movie setting from different angles. I rarely see any DVDs make use of this feature and was told this can only be found in some promiscuous movies. The real estate people should put this feature to work for them when trying to make a virtual tour for their potential buyers. - Copy Protection
Copy protection can only be added during the authoring step. Once a DVD is authored and mastered there will be no way to add copy protection. Common copy protection schemes are CSS and Macrovision. These are usually added at the last stage of the authoring before transferring the result of the authoring to DLT tapes. There is no copy protected DVD-R because DVD burners cannot write copy protection information onto a DVD-R. If you need copy protection on your final pressed DVDs, you will need to output your masters to DLT tapes instead of DVD-R. No all DVD authoring software can add copy protections. If a software can output the result to DLT tapes normally it will also have copy protection enabling feature. In any cases you should consult the User's Guide on how to enable copy protection. We will talk about this on few popular DVD authoring software programs.
2.0 The Workflow
As in cooking, making DVD is a step-by-step process. By and large, we can divide the process into these following activities.
2.1 Video Capturing (Video Transfer)
DVD is all about video (although this is not true; there is audio DVD and data DVD as explained above) and video comes from different sources. In order to create DVD on computer you will need to somehow convert the video source into computer video files for later editing. Common way of getting video into the computer is by IEEE 1394 Firewire. Most video camcorders now have a Firewire output. If you have the older camcorder then you will need to have a hardware capture card plugged into your computer. As the power of PCs is getting more powerful capture cards are becoming less popular. In either case just follow the User's Guides that come with the device to transfer your video into digital file.
A video capture software should be run on the computer to receive the video stream from the video source device. The user interfaces of the software differ among different pieces of software. The format for the captured video can be different too. It can be either AVI or Mpeg-2 and each format has its pros and cons. AVI is the raw video format with gigantic file size. A 10-minute video in AVI format can eat up 2GB of disk space easily. Being an un-compressed format, AVI preserves the video quality. If you have a powerful computer with a lot of disk space, AVI will probably be the best bet. Mpeg-2 is the native format for DVD and it is a compressed format, meaning the file size will be much smaller and the video is re-constructed based on a very complex mathematical algorithm. Since our ultimate goal is making DVD so capturing in Mpeg-2 format makes a lot of sense. The disadvantages of capture in Mpeg-2 format are: i) if you have a slow computer the CPU may not be fast enough to process and compress an individual frame which in turn causes drop frames; ii) you will have no control over how many passes need to compress the file into Mpeg-2. The quality of the video will improve if the compression software scans the video more than one time to determine the optimal streaming rates. But with real time Mpeg-2 capturing this is pretty impossible. Normally if the video does not have fast moving scenes then one pass should be ok.
2.2 Video Editing
Once captured, video has to be trimmed, re-arranged, cropped, and beautified by added effects such as transitions. Video editing can be the critical part of your project. Good or bad, the result of the editing dictates whether the DVD is professional or amateurish; outstanding or mediocre. There is an array of video edit software, ranging from totally free to couple of thousands dollars. We will discuss them thoroughly in the following sections.
There is an analogy between word processing and video editing. In word processing we are dealing with paragraphs and in video editing we are dealing with video clips. Let say you are writing a long essay such as this. Once the essay is written you will need to refine it rhetorically by doing some editing. So you will probably move paragraphs around, splitting a long paragraph into two or even three. The same applies to video editing. You might have a long scene that you want to divide, some bad scenes you might want to get rid of, and you might want to re-arrange the scenes in different chronological order.
2.3 Video Encoding
There won't be the need for encoding if there is only one video format. But in the video world there are many formats, namely AVI, MPG-1, MPG-2, DivX, MOV, WMV, etc. Encoding is essentially a transformation from one format to the other. An analogy will be for human language. A thought of "Thank you!" in English has to be translated to "Danker" in German so the recipient will understand. In the case of DVD, an AVI file has to be converted into MPG-2 format in order for the DVD player to understand. The software or hardware device usually associated with encoding is "Codec." Codec stands for Coding and Decoding and there are many examples in the real world that require these processes. Translation among different human languages is one example. In covert operation, a message may need to be encoded in a special way so only the intended recipient can read it. When the recipient receives the message he or she has to decode it. The rule governing the encode and decode process is called an algorithm. Another good example is the ubiquitous WinZip program. By zipping a file we are encoding it to another format and by unzipping it we are recovering (or decoding) its original content.
The encoding used for DVD is called Mpeg-2. Mpeg-2 not only converts the video but also compresses it and this allows a 4.7GB DVD-5 to hold video up to 2 hours. The DVD player (either the set-top unit or the software in a computer) will decode the Mpeg-2 stream and convert it back to video signal suitable to be viewed on the screen. It's a misnomer to call some software as a codec if they only do encoding without decoding or vice versa. So it's more appropriate to call some of them as encoder or decoder instead of codec. A codec should do both encoding and decoding.
2.4 DVD Authoring
Let say you have all the asset elements (i.e. video, audio, menu background, subtitles) ready, it's time to combine them together into an integrated DVD. Again, there are a lot of software products that can accomplish this goal. We will describe them in the follow sections.
2.5 DVD Mastering
The result of your authoring needs to be transfer to physical media such as DVD-Rs or DLT tapes for testing or for sending out for replication. At this stage you will need to consider issues such as copy protection and region limitation. If your DVD does not have menus, you will need to consider DVD specifications compliance which is ignored even by famous DVD writing software such as NERO.
3.0 The Roads to Rome
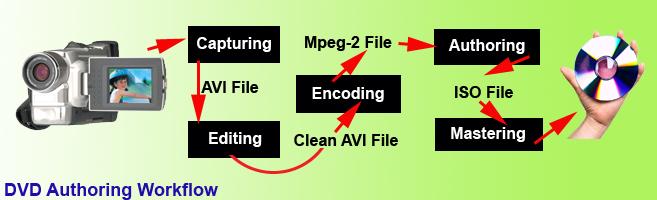
Referring to the above diagram and let's recap the workflow we have discussed earlier. The sequence of activities is: We Capture (or transfer) the video from the tapes on a camcorder into an AVI files on a computer. The captured AVI files may have lots of scenes and some of them may be useless so we need to go through the Editing to clean it up. Out of Editing we get a good AVI file but it's not the format to be stored as a DVD. So the AVI file will be Encoded into Mpeg-2 file making it ready to be used by the Authoring step. During Authoring, menus, subtitles, and/or audio tracks are added. The result of Authoring needs to be put on a physical medium such as DVD-R or DLT tapes and this is the job at the Mastering stage.
This is only an overview picture. There are still subtle intricacies that need to be dealt with at each stage. For example, out of encoding most software products require you to separate the video and audio streams as .m2v file and .ac3 files. These issues will be addressed later in the discussion.
3.1 Free Solutions
There are a lot of great DVD Authoring software products selling at very reasonable prices. So using free software should not be financially motivated. To me experimenting free software products is a good learning process. By going through each stage of the workflow with a dedicated software, you get the insight on why things are done in certain way. Eventually when you use commercial software you will appreciate the nature of work more. Just like if you know how to use slide rule using a electronic calculator will be a piece of cake.
Thanks to open source and unselfish programmers, there are many solutions here and each one of them is totally free. You can create you own suites of software by choosing a tool from each category of the workflow. When you move along the workflow the new tool chosen for the current activity should be independent to the tool chosen in last stage. For example, you can choose Windows Movie Maker or WinDV as your capturing tool and your editing tool should perform just well no matter which tool you have used during capturing. Listed below are the available tools for each stage of the workflow. For the sake of discussion, we will choose the path of WinDV (Capturing) > VirtualDub (Editing) > QuEnc & BeSweet (Encoding) > DVDAuthorGui (Authoring) > ImgBurn (Mastering) as an example.
For Capturing
- AMCap
This is a small yet fully functional video capture and preview application compatible with DirectShow and most video capture sources. - AVCutty
Not very intuitive at the beginning, but very fast and efficient trimming tool once you get used to the user interface. It has optical/digital scene detection and other functions for working with your videos. - CaptureFlux
The preview function doesn't seem to be working. - STOIK Capturer
Pretty stable and easy to use tool. It doesn't have the options to choose between Type 1 and Type 2 AVI as it always capture as Type 1. - VirtualDubMod
Though a powerful tool for editing, it's not very straightforward for capturing. Too many settings. - WinAVI Video Capture
Used to be a shareware and was free for a while. Now it is a commercial software with pop-up ads on many video related websites. Reviews on this software have been positive. It can capture video as AVI, WMV, RealMedia, Mpeg1, Mpeg2, Non-StdVCD, VCD, SVCD, DVD, and miniDVD. - Windows Movie Maker Microsoft’s free video editing software. Ideal for making slide shows.
- WinDV
Very simple and small capturing utility allows Type 1 and Type 2 AVI capturing. But it doesn't have the VCR like control buttons to control the camera.
For Editing
- AVCutty
Not very intuitive at the beginning, but very fast and efficient trimming tool once you get used to the user interface. It has optical/digital scene detection and other functions for working with your videos. - AVE Visual Editor
AVE Visual Editor enables user without any programming experience to use the power of AviSynth. With AVE Visual Editor you simply connect icons with lines and when graph is complete watch the output. - AVIDemux
Video editor and encoder. It can edit, encode, requantize MPEG and AVI including DivX. Very much like VirtualDub, but can also encode to VCD/SVCD/DVD mpg. - AVIEdit
AVIedit allows you to join and split avi files, extract frames and do whatever you want. You can capture video by number of ways, including one-frame-per-minute (web camera) option, workaround annoying 2 Gb file size limit, send your videos to printer, heavy compress it and post to your webpage. You can change framerate, duration, frame size, color depth of your videos and other properties, even without recompression and without loss of video quality. AVIedit allows you to convert avi clips to bmp and bmp to avi, animated GIFs etc. - AVSEdit
Official editor for avisynth. Requires .net framework 1.1. - TMpegEnc
One of the best MPEG video encoders, convert to MPEG2 (SVCD, DVD) and MPEG1(VCD) with several settings and filters. Freeware MPEG1(VCD) encoding. Also basic joining, splitting, demultiplexing and multiplexing features. MPEG2 encoder expires in 30 days. - VirtualDubMOD
VirtualDubMod is a unification of several popular modifications of the famous video editing software VirtualDub. Unification of three projects, VirtualDubMPeg2, VirtualDubOGM, VirtualDubAVS and more. - WAX
Wax is a high performance and flexible video composing and special effects software. The idea for Wax is to be very general purpose and flexible in video composing and effects, so that you can compose your dream video sequence with ease every time. - Windows Movie Maker
Windows Movie Maker makes home movies amazingly fun. With Movie Maker, you can create, edit, and share your home movies right on your computer. Build your movie with a few simple drag-and-drops. Delete bad shots and include only the best scenes. Then share your movie via the Web, e-mail, or CD. Using third-party software you can even take movies you've made and turn them into DVDs. You can also save your movie back to the video tape in your camera to play back on a TV or on the camera itself. - Zwei-Stein
Zwei-Stein 3.01 is a freeware non-linear, non-destructive video composing and editing system which offers many advanced features unavailable elsewhere. With Zwei-Stein you can edit up to 256 video, audio and still image clips, each with up to 64 effects chained serially. Cropping, panning and custom effects are easy with automatic key frames.
Encoding
- AVI2DVD
Avi2Dvd is a GUI in order to convert with just one click an Avi/Ogm/Mkv/Wmv/Dvd to Dvd/Svcd/Vcd. - AVIDemux
Video editor and encoder. It can edit, encode, requantize MPEG and AVI including DivX. Very much like VirtualDub, but can also encode to VCD/SVCD/DVD mpg. - HCEnc
HC is a free MPEG2 Encoder. Input can be a d2v project or input using Avisynth. 2 pass VBR encoding. Variable GOP structure dependent of the video content or fixed GOP structure. Scene change detection. Pre-programmed matrices or use your own matrices. Restart possibility to run the second pass again. Bitrate control: average and max bitrate can be set. - QuEnc
QuEnc is an easy to use MPEG-2 encoder that is completely free, yet yields amazingly good quality (no, it doesn't beat CCE SP, but there's a $1900 price difference between the two). It's also quite fast for an MPEG-2 encoder, but since it's a full encoder, not a compressed domain transcoder, you won't get your DVDs done in 20 minutes.
Authoring
- AVI2DVD
Avi2Dvd is a GUI in order to convert with just one click an Avi/Ogm/Mkv/Wmv/Dvd to Dvd/Svcd/Vcd. - DVDAuthorGui
DVDAuthorgui is a very basic win32 front-end for the DVDAuthor project. The gui is meant to be an easy means to create a basic dvd. Features: multiple titles (pgc), multiple titleset menus, m2v still creation, chapters, subtitles, multiple audio streams, basic navigation commands, iso creation. - DVDStyler
DVDStyler is a cross platform GUI front-end to the dvd authoring and recording programs dvdauthor and dvdrecord. It is free software distributed under GNU General Public License (GPL). - IfoEdit
IfoEdit is the first freeware program to be able to multiplex elementary audio and video streams and create a fully compliant DVD disc out of it. If you're only using your favorite DVD authoring program to create 1 video movies without menus IfoEdit is perfect for you. It can multiplex any DVD compliant MPEG-2 streams, DVD compliant audio streams (AC3, LPCM, MP2 and DTS), DVD subtitle streams and you can create your own chapters. Considering that a lot of DVD authoring programs have limitations when it comes to the number of audio streams, audio format, number of channels in audio streams and subtitles, IfoEdit's feature set is pretty impressive indeed. - Muxman
DVD multiplexer/authoring tool. The most important component of any DVD authoring system is its multiplexing engine. It should be flawless, and well tested. This is the purpose of my very simple first authoring program, Muxman.
Mastering
- AVI2DVD
Avi2Dvd is a GUI in order to convert with just one click an Avi/Ogm/Mkv/Wmv/Dvd to Dvd/Svcd/Vcd. - CDBurnXP Pro
CDBurnerXP is a free application to burn CDs and DVDs, including Blu-Ray and HD-DVDs. It also includes the feature to burn and create ISOs, as well as a multilanguage interface. - DVD Decrypter
One of the best DVDDecrypter tool, it enables you to decrypt and copy DVDs to your HD. It can also make DVD images and burn DVD and CD images. No longer developed, use DVDFab Decrypter or AnyDVD if you get any ripping problems. - ImgBurn
ImgBurn carries on from where DVD Decrypter left off! (Well, for the burning part anyway!). ImgBurn can write most types of CD / DVD images and it supports all the latest writers (including booktype / bitsetting on many of the major ones - i.e. BenQ, LiteOn, NEC, Plextor, Sony). You can even use ImgBurn to erase / format your rewritable media! - IfoEdit
IfoEdit is the first freeware program to be able to multiplex elementary audio and video streams and create a fully compliant DVD disc out of it. If you're only using your favorite DVD authoring program to create 1 video movies without menus IfoEdit is perfect for you. It can multiplex any DVD compliant MPEG-2 streams, DVD compliant audio streams (AC3, LPCM, MP2 and DTS), DVD subtitle streams and you can create your own chapters. Considering that a lot of DVD authoring programs have limitations when it comes to the number of audio streams, audio format, number of channels in audio streams and subtitles, IfoEdit's feature set is pretty impressive indeed.
3.1.1 Example:
Step 1: Connect the cable from your DV camera to your IEEE 1394 controller card or your capture card.
Step 2: Download WinDV from http://windv.mourek.cz/download/WinDV-1.2.3.zip and unzip the file to any directory on your hard drive. There is no need to install the program. You can simply run the program directly by double-clicking  .
.
Step 3: Click the [Config...] button
Choose [type-2 AVI (vids+auds)] from the next dialog then click "OK"
 |
Tick the checkbox next to the [Config...] button and then provide a file name in the [Capt. file:] input field. Make sure the folder name for the file name has been created. For example, if "g:\DVDCapture" fold is not created in the above example, WinDV will bomb in a very unfriendly way by saying [ "Runtime Error!" ... "This application has requested the Runtime to terminate it in an unusual way. Please contact the application's support team for more information."] You can stop the capturing by pressing the [Cancel] button any time. The capturing will also stop when there is no video signal coming from the DV camcorder. |
Step 4: Download VirtualDub from http://www.virtualdub.org/download and unzip the files to a directory on your hard drive. Again, there is no need to install the application, just double-click the  icon to fire up the program.
Step 5: Click [File] > [Open video file] to open the file we have captured in Step 3.
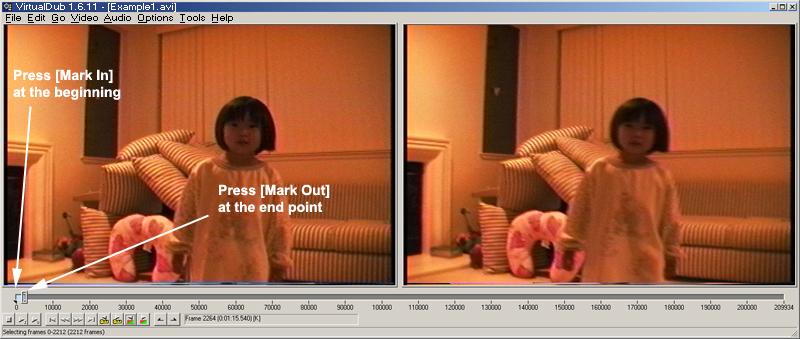
Step 6: As you can see the opened AVI file has some video noise at the beginning. This is normally the case because most video tapes are non-recordable for the first few seconds.

When VirtualDub is opened you can see two screens as shown above. The left screen represents the source file and the right screen represents the result of the editing. The three controls we are going to use are i) the video play head, ii) the [Mark In] button, and the [Mark Out] button. The other buttons are just there for you to navigate to the specific point of the video but I found them less efficient as compared with moving the play head. You can move the play head quickly along the timeline to get to any point very quickly.
By and large editing is a matter of trimming and rearranging of the video. To trim the unwanted portion of the video you just move the play head to the beginning position where you want the trimming to start; press the [Mark In] button to mark it, then move the play head to the ending position where you want the trimming to stop; press the [Mark Out] button. The time between the [Mark In] and [Mark Out] will be highlighted. You can either press the [Delete] button on the keyboard to delete it or press [Ctrl-X] to delete it and put it into the clipboard. By putting into the clipboard you can paste it to any place where the play head is positioned.
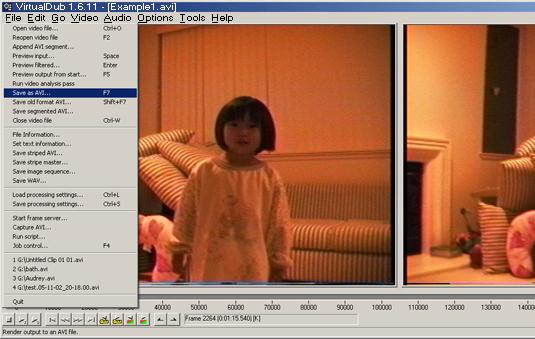
Step 7: Once you have finished the editing, click [File] > [Save as AVI...] to save the edited file which will be used as input for encoding.
Step 8: Download QuEnc from http://www.afterdawn.com/software/video_software/video_encoders/quenc.cfm and unzip the file to any directory on your hard drive. Start QuEnc by double-clicking ![]() .
.
Step 9: Chose the source file we saved in Step 7 and press the [Encode] button.
Step 10: As a result of the last step, you now have an m2v file which is essentially the video portion of the movie. In this step we will try to get the audio out using a tool called BeLight. You can download Belight from http://corecodec.org/projects/belight. Run the .exe file to install BeLight and start the program after the installation.
Step 11: Click on the [AC3] tab, press the [Input] button to locate the file we finished in Step 7. The output field will be automatically filled in.
Press the [Start] button to start the audio ripping.
Step 12: Download DVDAuthorGui from http://www.videohelp.com/~liquid217/dvdauthorgui.pl?p=download. Install the program and run DVDAuthorGui after installation.
Step 13: Press the [add title] button to add the m2v and ac3 files.
Step 14: Choose [file] > [create iso after authoring].
Step 15: Once the files are added, press the [author dvd] button.
You will be asked to name a fold where the result of the authoring will be stored. Just give any name you like. Depending on the length of the video and the speed of your computer it may take 15 minutes to hours to finish up this process. Once done, you will have the VIDEO_TS and AUDIO_TS folders in the directory you have named earlier.
Step 16: With the ISO file we have created in Step 15, we now have everything we need to burn the result to a DVD. You can use any disc burning software that supports image burning. Nero and Roxio Easy Media Creator are the most common ones. You can also use free tool such as ImgBurn. Simply download ImgBurn from http://imgburn.com/index.php?act=download then install it.
Step 17: Once started, click on the [Source] browser button to choose the ISO file we have created in Step 15, put a blank DVD-R into your DVD writer, and then press the green go button. Voila! In about 10 minutes you will have the DVD burned.
If you use Nero, just choose the [Burn Image to Disc] button and then choose the ISO file we have created in Step 15 and the rest should be self-explanatory.
3.1.2 Quicker and Easier Ways
With all the exercises so far, you must be asking the question: Is there a better way? Yes! There are quicker and easier ways and they are being listed here. The example above was deliberately chosen to illustrate the logical flow of information from one stage to the next. Once you understand this flow it will be much easier for you to appreciate some other software products.
| Solution | Tools used | Description |
| 1 | WinAVI Video Capture, ImgBurn | If your source video is pretty clean, you can choose to capture the video directly into DVD format using WinAVI Video Capture and then create the ISO file using ImgTool. Burn the ISO file using ImgBurn. |
| 2 | WinDV, VirtualDubMod, AVI2DVD, ImgBurn. | Capture the video as Type 2 AVI with WinDV, edit the video using VirtualDubMod, author the DVD with AVI2DVD to create the ISO file. AVI2DVD integrates the Encoding and Mastering procedures into one program and you have few encoders to choose. Use ImgBurn to burn the ISO file into DVD. |
| 3 | AVIEdit, QuEnc, DVDAuthorGui, ImgBurn | Capture and edit with AVIEdit, encode with QuEnc, master with DVDAuthorGui, burn with ImgBurn |
| 4 | WinDV, ImgBurn | Capture with WinDV, edit, encode, and master with DIKO, burn DVD with ImgBurn. |
Again, you are not limited to the ways we have listed. Feel free to mix up the software products to create your own suite. Some software products require your to write an Avisynth script which is beyond the scope of our discussion.
If you have experimented a somewhat different way, please email me and I will list it here with a credit link back to your site.
3.1.3 Adding Sub-titles
Many of the authoring tools in this section have the capability of adding subtitles. The theory behind subtitles is pretty simple -- You just need a script file telling the authoring tool the beginning and ending time and the text for a subtitle. You can pretty much do this without the help of any tools. All you need is just watch the movie and then record all the time intervals of conversation and then create a mapping file with the subtitle texts. For example,
1
00:00:00,790 --> 00:00:02,662
Bonjour! Monsieur.
2
00:00:24,523 --> 00:00:27,879
Bonjour! Madomoiselle.
3
00:00:55,516 --> 00:00:56,934
Ça va?
4
00:00:58,229 --> 00:01:01,316
Ça va!
But this will be a tedious effort. You should turn to subtitle tools unless you have too much time to waste. Subtitle Workshop is among one of the best free tools. You can use this tool to do your marking and subtitle editing and here is how.
Step 1: Download Subtitle Workshop 2.51 from http://subworkshop.sourceforge.net/, unzip the download file to a temporary directory and then run the program installer.
Step 2: Start Subtitle Workshop from [Start] > [Program] > [URUSoft] > [Subtitle Workshop] > [Subtitle Workshop].
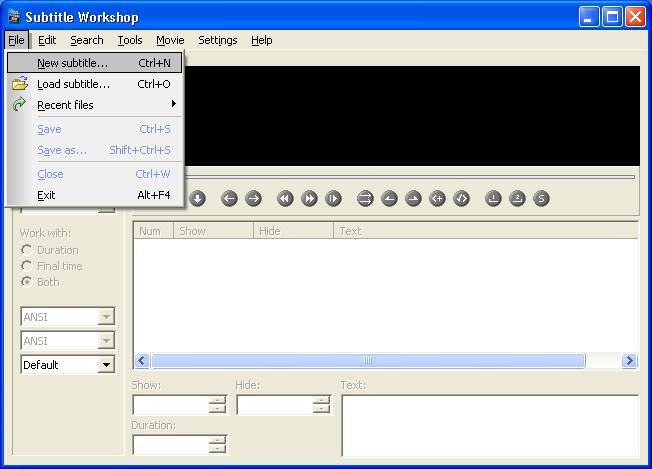
Step 3: Go to [File] > [New subtitle...].
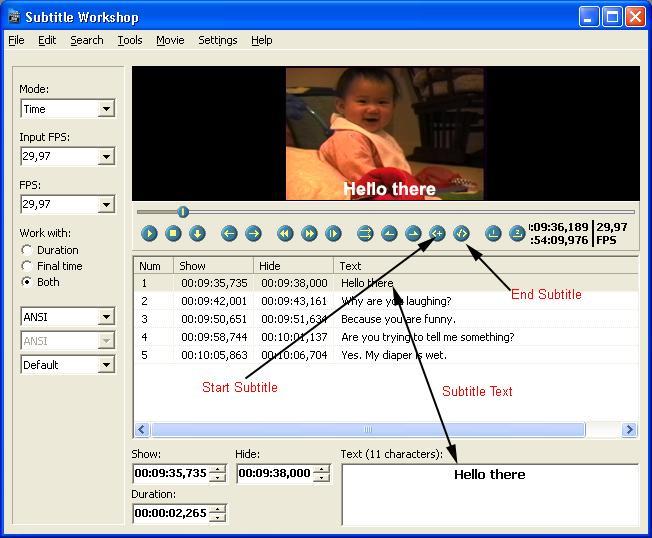
Step 3: Go to [Movie] > [Open] to load the movie into the program.

Step 4: Once the movie is loaded, you can then play the move and mark the starting and ending points for a subtitle. You can stop the movie any time, make a slight backward or forward, and edit your subtitle as shown below. All the control buttons have tool tips. You just need to mouse-over the individual control the the tips will be shown. It's very straightforward.
Step 5: When the whole subtitling task is done, you can save the file by going to [File] > [Save as..]. Subtitle Workshop allows you to save the subtitle for many authoring programs. Just choose the format that your authoring program will need and then provide a file name. This file will become one of the assets when you do the authoring.
3.2 Medium Priced Commercial Products
If you can afford couple of hundred bucks then do yourself a favor by buying some great software products. Commercial software products do save you a lot of time in many ways. First they tend to integrate the functionality of the workflow into a single application and they tend to be more stable then their free counterparts. Although this is debatable, the quality of the DVD created is usually better.
Look for the software pack that comes with your digital camcorder first. There is pretty good chance you already possess some basic software for DVD capturing, editing, and authoring. Roxio MyDVD is the most common DVD authoring software that bundles with digital camcorders.
With over hundreds of software products you can choose, it is very easy to get lost. It is my intention here to clarify the uncertainty and fit them to our workflow. It will be a big mistake to buy an editing software then find it cannot do authoring.
The software products I choose to write about are from the following companies
| Manufacturer | Product | Price | Capturing | Editing | Encoding | Authoring | Mastering |
| Adobe | Premiere Pro CS6 | $799 | Premiere Pro is integrated with Adobe’CS6. You can use it for capturing, editing, and encoding. If your DVD does not have interactive menus, you can also use Premiere Pro to burn the DVD directly from the timeline. The selling point of Premiere is its editing capability. If you can afford to have After Effect, another piece of Adobe software costs about $ 999, you can create many special effects. | ||||
| Encore CS6 | $349.99 | Encore allows you to import AVI files as assets and then encode them. It also let you create sophisticated interactive menus and then burn the result to DVD-R or transfer it to DLT tapes. Encore can be used to authored DVD-9 -- the dual-layer media. CSS and Macrovision copy protections can be enabled. | |||||
| Pegasys | TMPGEnc MPEG Editor | $48.00 | This is an editing tool for Mpeg. The source files have to be in Mpeg format or from an authored DVD. It can be used as a DVD ripping tool or Mpeg touch-up tool. | ||||
| TMPGEnc 3.0 XPress | $58.00 | This tool allows the import of AVI, Mpeg, and DVD vob files. The editing functions are limited to trimming and re-arranging. This is a great tool for preparing Mpeg-2 file for later authoring. The best feature is the crop filter which allows to crop the video to get rid of the un-wanted edges along the four sides of the screen. | |||||
| TMPGEnc DVD Author 1.6 | $68.00 | This tool adds the Authoring and Mastering functions to TMPGEnc MPEG Editor. The editing function is very limited and it lacks the nice filters found in TMPGEnc 3.0 XPress. It does allow the authoring of DVD-9 but it does not have the copy protection enabling capability. | |||||
| MediaChance | DVD-lab PRO | $199.00 | This is a great authoring and well-priced tool. It can do almost everything a high-end authoring tool can. It allows the authoring of both DVD-5 and DVD-9 but lacks the copy protection enabling capability. | ||||
| Corel | VideoStudio Ultimate X6 | $99.99 | I believe this is a formerly Ulead product. Ulead did pretty good in capturing the low-end video editing market. With a fraction of the money you need to pay Adobe you can get a pretty decent software with almost all the parallel features. Corel took over Ulead and has improved the performance of the software with tons of new features. | ||||
| Ulead Media Studio Pro 8 | $399.99 | This is a powerful video editing tool made by Ulead and now carried by Corel with all the functionality of Adobe Premiere. It allows capturing, editing, and encoding all done in a single suite. There is also an audio editor built-in. |
|||||
3.3 Advanced Solutions
If you are rich and decide not to donate some of your wealth to a nice guy such as myself, then go for the top of the line products from Sonic. When you buy retail DVD movie such Star War chances are the DVD was not authored by free software or the medium priced software. Sonic claims 80% of the Hollywood movies are authored by their flagship product Scenarist. There may be some truth in such claim as Scenarist is the most advanced DVD authoring software you can have (most expensive too). Some less expensive competitions include Sony Vegas,
4.0 Common DVD Authoring Mistakes
As a DVD replicator we have received over thousands of DVD masters from our clients. It is our pre-mastering QC's job to check the masters for errors and compatibility. To our surprise, more and more DVD masters have problems in some form or other. Let's briefly list the commonly seen problems here in a hope that you will not commit the same mistake when you make your DVD for replication.
4.1 Not enough space between IFOs and BUPs.
Nero, being the most popular disc burning software on the market, has its Achilles' heel. When you use Nero to burn an ISO file, NERO will try to help you conserve space by packing all the files tightly and disobey the original ISO layout. The consequence of this is: The CRC Error Protection designed for DVD might be broken.
How could this happen! To understand why we need to know a little bit about the structure of a DVD. Normally within the VIDEO_TS folder you will see the VOB files are sandwiched between the IFO and BUF files. The IFO files contain the pointer information, more or less like the table of contents for a book. The VOB file is the actual content, and the BUP file is a backup copy of the IFO. Without the IFO file the a DVD player would not know where to start and where to end. If the IFO file is damaged, the DVD player will try to look for the playing direction from the BUP file. Unless both the IFO and the BUP files are damaged then the DVD is doomed.
Most reputable DVD authoring software will try to leave a gap between the IFO file and the BUP file when the VOB file is too small. But Nero will break this layout by squeezing all the files together. If this happens, your disc will still play without any problems until some day the area contain the IFO file is scratched or damaged. DVD players will try to recover the damaged data from the backup sector, i.e the .BUF file. But if there is no enough space separating between the IFO and the BUF file, chances are the same scratch that damages the IFO sectors also damages the BUP sectors rendering the DVD totally useless.
The solutions to this is to re-create your DVD with the proper gap. If you DVD have menus chances are the VOB files are big enough and you won't need to do anything. But if your DVD is the simplest kind with a video playing from the beginning to the end, then you should do some patch work. The article here will be your solution.
4.2 Try to create a copy protected DVD-R
A commonn misconception is that when you author your DVD with the copy protection flags enabled, then you can burn a copy protected DVD-R. The fact is there is no copy protected DVD-R. Copy protected DVD can only occur on pressed DVD, i.e. the DVD discs that are manufactured from a glass stamper. That's the main reason why replicators will need you to provide DLT tapes instead of DVD-R as master when you request to have copy protection.
The reason behind this is copy protection information is written only on certain track of a DVD. As member of the DVD Forum all DVD equipment manufacturers are bound by the rules so DVD burners cannot write such information on a DVD-R. If you are a firmware guru you might be tempted to think you can hack the firmware code so the writer can record copy protection information. Although I cannot be 100% sure, DVD-R manufacturers might also be bound by the rules not to have the copy protection track writable.
4.3 Didn't test playability on enough number of players
DVD technology, though a decade old, is still not mature to the point that there is a universal compatibility. To create a DVD that will work on all DVD players is really a myth. If you can get your DVD work on 90~95% of the players than you are in pretty good shape. The incompatibility comes from the fact that DVD players has evolved and there are old DVD players and new DVD players. There are also DVD players stick to the DVD specifications tightly and there are DVD players that are more tolerant to error.
If you don't have a matrix of DVD players then you won't have the assurance. A DVD plays well on your own DVD player does not mean it will play on other people's DVD players. That's why it's crucial to hire a reputable replicator who will test your master on different mix of DVD players. New Cyberian Systems, Inc. will test our clients' DVD master on about 20 brands such as Apex, Pioneer, Samsung, Sony, Toshiba, etc. The brands we choose represent a good market distribution that covers from high-end to low-end players.
4.4 Use cheap DVD-R as master
DVD-Rs are made all the same, after all they are all digital and either they work or they don't, right? If you believe in that then you are dead wrong. Cheap DVD-Rs, I mean in terms of quality, have plagued the market. When you burn a DVD-R with NERO and congratulated with the "Successful" dialog, you usually have the comfort of mind that the burning is truly successfully. After reading this, think again!
There are only a few DVD recordable media manufacturers in the world. The brand name DVD±Rs you buy from a physical or online store are mostly likely not manufactured by the brand owner. For example, DVD±Rs carry the name of HP could be manufactured by a Taiwanese company called CMC. Ritek, another recordable media giant, turns out ultra good quality discs (so called grade A) and some craps (so called grade C).
If you only need to duplicate few DVDs for friends and families, then getting the cheap DVDs won't do you too much harm. The worse case is you just burn the DVDs into coasters and burn a little bit of your time and money. But when it comes to high quantity replication, you'd better be picky on the DVD-R media. Bad DVD master will result in many quality related issues such as skipping, freezing, and blockiness.
Good DVD-R brands include: Apple, Fuji, Maxell, Sony, Taiyo Yuden, and TDK. Try to avoid Imation, HP, Kodak, Philips, Princo, and Radius. But don't just take my word for it. Always find out the Media ID of the media you just bought by using tools such as DVDInfo/DVDInfoPro. The tool will tell you who's the true manufacturer behind.
You should also test your media with CD-DVD Speed.
4.5 Mis-handling of DVD
Scratches and finger prints on the data side of a DVD are absolutely No-No's for glass mastering. Very often people damage the DVD surface without even knowing it. Believe it or not, the plastic on the DVD surface is actually very soft. If you put a DVD and rub it on a table top softly, it won't need hard examination for you to see scratches are already all over. Although DVDs are designed to have error correction, too many errors will slow down the decoding. From the mastering point of view, too many scratches will reduce the reliability of the stamper. To avoid a "garbage in garbage out" situation, you should
- Never put a DVD on a table without proper protection
- Never touch the DVD surface with your fingers. Always handle a DVD with the thumb on the rim and another finger through hole at the center hub. If you find fingerprints on the DVD surface, clean them with a damped tissue or a alcohol cotton swab.
4.6 Didn't enable verify when burning the DVD-R
Disc burning software programs usually have the "Verify" function. For example, Nero Express has the "Verify data on disc after burning" checkbox at the final stage of the wizard before you hit the [Burn] button. If you find such feature, check it! This is a very economical way to have a final sanity check. In our daily routine of duplicating thousands of discs every day, we have found many instances of successful burn but fail the verification. The failure can be caused by many unforeseeable reasons such as voltage fluctuation or dirt on the laser head.
4.7 Send only one master copy to your replicator
When you send your master to a replicator, it's always good idea to send two copies. Why? The master you send out will go through a long journey and be passed along many hands. The stamping machine at the US Post Office, the guy throwing parcels at the FedEx hub, the conveyer belt at the UPS sorting facility all can contribute to damage your DVD master. Once again, in our experience in receiving thousands of masters from our clients, we have found very often the masters are damaged or useless for other reasons. If we don't have a backup copy to work with, all we can do is to call the clients and ask to send us the master again. You not only waste money on the shipping, but also delay your deadline. Just as an insurance, always send two or more copies to your replicator; especially when your project is mission critical.
4.8 Did not include a PCM or AC-3 audio track for NTSC video
NTSC DVD allows to have 8 audio tracks. Audio formats supported by the DVD specifications are AC3 and PCM. Many DVD players also support the MPEG-I Layer II format, especially those cheap DVD players that are meant for the Asian market to support VCD and SVCD. These DVD players have now entered the US market and are at the price range from $20 ~ $50. If you author a DVD and test on these players there is unlikely that you will find any problem. The dilemma is the cheaper the DVD player, the smarter it is. The expensive brand name DVD players stubbornly stick to the DVD specifications and might have problem if you only have MPEG-I Layer II audio format. When space is an issue, you should give up PCM but at least include AC-3. Good authoring software will give you a warning if you have neither PCM nor AC-3. Try not to igore that!
4.9 Set a bad layer break for DVD-9
Remember DVD-9 is a single-side dual-layer format? The DVD layer break is the place where a dual layer DVD switches from the first layer (layer 0) to the second layer (layer 1). DVDs are laid out in sectors with each sector contains 2048 bytes of content. The first sector of a DVD is sector 0; the second sector is sector 1, ......... the nth sector is sector (n-1). This way, the first sector of layer 1 is actually the number of sectors on layer 0.
Ideally you should set the layer break point near the middle of the video with layer 0 slightly longer than layer 1. To understand this we need to know how the play head in a DVD player travels. Starting from sector 0 on layer 0, the play head will travel away from the center until it reaches the break point. Once passed the break point the play head will switch to layer 1 and travels back towards the center of the disc. With this in mind you will understand why you cannot set layer 0 smaller than layer 1 because doing so layer 1 won't have enough space.
Theoretically you can set the break point with layer 0 substantially longer than layer 1. But this suffers from the disadvantage that layer 0 content will be written close to the outer radius of the disc. DVD disc are read more reliably closer to the center. Although you are unlikely to see any problems for new DVD players, old players might create problems such as skip or freeze.
Besides, the break point should occur at a sector number that is divisible by 16. The reason for this is an ECC (Error Checking and Correction) block is formed for every 16 sectors. If the break point is set at non-sixteen-divisible sector, an ECC block will be split by the layer break point.
If you DVD authoring software supports DVD-9 it should give you the advise where the break point should be set. Make sure to read the User's Guide that comes with your software to set the break point correctly and wisely.
4.10. Broken menu links
Menu links are like the hyperlinks on a web pages. If configured incorrectly their behavior will be quite different from what you have expected. Common problems are
- Link to the wrong clip
- Link to nowhere; meaning no effect on clicking
- Link to non-existing clips; same as the page not found on web pages
4.11. Menu text cropped
Most DVD authors assume a computer screen is same as a TV screen. In reality, the TV screen border is thicker than what you might have thought. Very often we receive masters from our clients that play perfectly on a computer but the menu text got cropped when played with a set-top DVD player on TV. So when you author your menu, always keep in mind that the visible area between a computer monitor not the same as a TV screen. Good authoring software normally will provide a suggested safe-zone and you'd better follow the suggestion to avoid your menu texts disappear or half-cut on a TV screen.
4.12 Hard code drive letter for enhanced DVD, i.e. DVD with video and data
An enhanced DVD is a DVD with both video and data sessions. The intention is to make the DVD viewable on both set-top DVD players and computers. A common problem we found on enhanced DVD is that the video works perfectly on set-top DVD players but fail on some computers. One obvious problem is that the author fails to see that every computer in the world is more or less different. A program works on computer A doesn't mean it will work on computer B. Hard code drive letter is the #1 crime in computer programming. A DVD-ROM drive called D: one my computer doesn't mean it will be called the same on other computers. If you hard code the drive letter, your DVD will fail on other computer systems that don't have the same drive letter as yours. We had clients yelled to the hell that their DVDs were OK. But when asked to test on other systems other than the authoring unit, they immediately saw the problem. So do test your DVD thoroughly on different systems before signing it off to a replicator.
4.13 Audio and video out of sync
The causes of AV out-of-sync are manifold. They can occur during capturing, editing, compressing, and rendering. With the ever increasing computation power of an average PC A/V out-of-sync is becoming less a problem, albeit still found in many DVD masters that were sent to us. Studies showed we human can tolerate audio lagging video more than audio leading video. The A/V out-of-sync acceptability thresholds are 185 ms for audio lagging video and 90 ms for audio leading video.
Common causes of AV out-of-sync are:
- Drop-frame is the number one culprit for AV out-of-sync. Drop-frame occurs when the computer is not fast enough to process the video and audio stream. You can minimize the occurrence of drop-frame by having computer with powerful CPU, a hard drive with high spinning speed and seek-time, and you should optimize the performance of your hard drive by defragmenting it from time to time.
- Choose the mismatched attributes for source audio and capturing settings. For example, if the DV audio is set at 12-bit 32KHz and you choose the 48KHz project setting for capturing, AV out-of-sync is likely to occur.
- Do not use the hardware profile for capturing. Good capturing software usually have a set of hardware profile for you to match your device. If your device is not in the list you can only choose the generic profile. Doing so will leave a lot of guess work for the software. For example, the audio frequency of certain brands of camcorders might not be truly 48KHz but 48.0005KHz. Without the hardware profile to compensate this discrepancy the captured audio will have many sample cycles less then the source audio; 5 x 3600 = 18,000 cycles to be exact in one hour.
A good way to check whether AV out-of-sync occurs is to demux the audio and the video, i.e. separating them as two individual files. Play each file in any compatible players (such as Windows Media Player) and then observe their lengths. If the lengths differ than there is AV out-of-sync for sure.
4.14 Subtitle out of sync
This is purely a careless mistake with crappy quality control. We point it out here just for you to add this as your checklist. Since you know your own DVD better than anyone else in the world, only you know the answer where and how to fix it. Word of advise: The same old hackneyed cliche - Test the DVD thoroughly before signing it off to the replicator.
5.0 DVD Replication & Duplication
Chances are you won't just need one or two copies of a DVD and you will need to mass produce them. You can have your DVD replicated; meaning the disc will be pressed, or you can have your DVD duplicated; meaning the disc will be burned to DVD-R or DVD+R media.
In the media production industry the terminology for making DVDs is called "Replication" as opposed to "Duplication". To the laymen, Replication and Duplication probably means the same. But to the people in the CD and DVD manufacturing industry, there is a subtitle difference. When people say replication they usually mean the discs will be pressed rather than burned from recordable media. All retail DVDs in department stores or video outlets are pressed DVDs made by replication.
Replication is the process of replicating a master disc using a glass stamper (or mold). Melted polycarbonate is injected under high pressure onto the stamper to form the bits of information on the disc. The disc is then layered with a reflective coat and a protective laquer layer. Replication is the official way to make DVD with the highest quality and professional look. This is done in a high temperature controlled and dust free environment.
Part of the replication process is the printing of artwork on the disc. Usually there are two ways to do it, i.e. offset and silkscreen. The choice between offset and silkscreen is a matter of preference; while offset is good for artwork with full-color photo, silkscreen is good for artwork with more vector graphics such as logos and texts.
You should always try to use replication service unless you don't have enough time or if your quantity is small; in such case you can use duplication. The artwork for duplication is usually printed on a paper label and then the label is stuck onto the disc surface. This is labor intensive task and that's why duplication service, despite the lower quality, is more expensive then replication service in terms of unit prices.
Duplication also suffers from the compatibility problem. Not all DVD players can play recordable media although the coverage is about 85%. That means there is chance a duplicated DVD will not play on certain player. The DVD player market has a very funny phenomenon, i.e. the cheaper the DVD player, the more capable it is to play DVD. The low-end $30-50 DVD players usually play DVD discriminatorily. They don't care whether the DVD is duplicated or replicated, nor NTSC or PAL. The high-end brand name DVD players are very picky on the DVD they are trying to play.
5.1 How to choose DVD replication service provider?
Just like buying a car, there is a huge price difference among DVD replicators for the same quality of service and value. Paying higher does not guarantee getting better quality. The price for 1000 DVD can range from $750 to $1600, and depends on your ability to spot hidden costs or not, you can be adding couple of hundreds buck to the final bill if you are not careful.
Always look for a replicator who do not have setup fees and hidden fees. Typical setup fees are stamper and film charges. Some replicator will charge based on the number of colors on the artwork. For full-color printing there are five colors; each color for CMYK and the white background (so called white flood). So be careful about the fine prints on their web, brochures, or terms and conditions.
Alternatively you can googe the keyword "DVD replication" or "DVD duplication". Just a word of advise, avoid the big giants as they normally have very bad prices and customer services.
Last but not least, since DVD still has a lot of compatibility issues, you should ask your replicator how many DVD players they will put the replicated disc on test. A DVD works on Sony player doesn't mean it will work on Pioneer player. At New Cyberian Systems we test all our replicated DVD on about 20 players, from the brand names to the less known, to make sure the highest percentage of playability.
6.0 Glossary
Coaster
is a slang term for an optical disc (CD, DVD, etc) that doesn't work, normally because of bad quality of the optical disc itself, failure during the CD/DVD burning process, etc. So, such disc just creates an excellent, shiny coaster to use with your late night pint
7.0 References
DVD authoring - Wikipedia, the free encyclopedia
DVD Demystified